Why Sterilizing Baby Gear Matters
Sterilizing baby gear can feel like one of those quiet, behind-the-scenes parts of parenting. It is not as emotional as a first smile or as memorable as a first bath, but it matters in everyday life. Babies explore the world through feeding, sucking, touching, and chewing. Bottles, pacifiers, teething toys, pump parts, and feeding accessories often move from tiny hands to tiny mouths within seconds.
That is why sterilizing baby gear is less about creating a perfect, germ-free home and more about reducing unnecessary exposure to harmful bacteria. Babies, especially newborns, are still building their immune systems. Their bodies are learning to handle the outside world, and clean feeding items give them a safer start.
Still, it is easy to overthink it. Many parents wonder what really needs sterilizing, how often to do it, and whether washing with soap and water is enough. The answer depends on the item, the baby’s age, and the situation at home. Sterilizing does not need to become a stressful ritual, but it should be done thoughtfully.
Cleaning Comes Before Sterilizing
Before anything can be sterilized, it has to be cleaned properly. This is the step that some people rush, but it is actually the foundation of the whole process. Milk residue, formula, saliva, and tiny bits of food can cling to bottle nipples, caps, valves, and pump parts. If those are not washed away first, sterilizing may not work as well.
Start by taking everything apart. Bottles should be separated from nipples, rings, caps, and any small internal pieces. Breast pump parts should also be disassembled according to their instructions. A quick rinse is helpful, but it is not a replacement for a proper wash.
Hot, soapy water and a clean brush used only for baby feeding items are usually enough for the cleaning stage. Small spaces, like nipple holes and bottle threads, need extra attention because residue often hides there. After washing, the items should be rinsed well and allowed to air-dry on a clean surface.
Sterilizing baby gear works best when it follows this simple rhythm: wash first, sterilize second, dry carefully, then store safely.
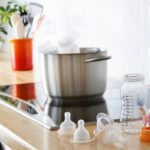
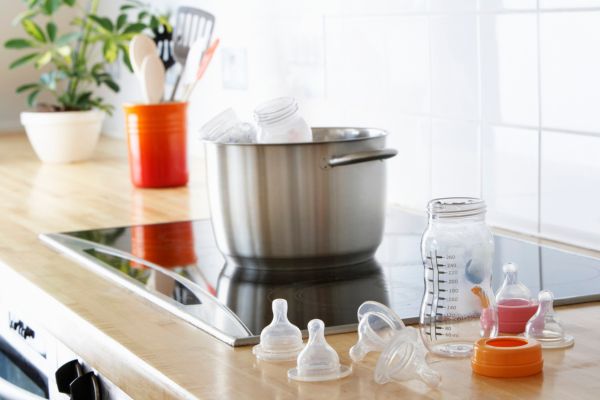
Boiling as a Traditional Sterilizing Method
Boiling is one of the oldest and most familiar ways to sterilize baby feeding items. It is simple, low-cost, and does not require a special machine. For many families, it is the method they trust most because they can see exactly what is happening.
To use this method, cleaned items are placed in a large pot and fully covered with water. The water is brought to a boil and kept boiling for the recommended time. The pieces must stay submerged so every surface is exposed to heat. After boiling, clean tongs can be used to remove the items and place them on a clean towel or drying area.
The main advantage of boiling is accessibility. Most homes already have a pot and stove. The downside is that repeated boiling can wear down some materials more quickly, especially soft bottle nipples and pacifiers. Over time, rubber or silicone parts may become sticky, cloudy, cracked, or stretched.
Because of that, it is important to check baby gear often. If a bottle nipple has tiny tears, thinning areas, or a changed texture, it should not be used. Sterilizing is helpful, but it cannot make damaged baby gear safe again.
Steam Sterilizing for Everyday Convenience
Steam sterilizing is a popular option because it is fast and practical. Steam can be produced through an electric sterilizer, a microwave sterilizing container, or certain dishwasher settings if the item is safe for that use. The basic idea is the same: heat and moisture work together to reduce germs on clean baby items.
Parents often like steam sterilizing because it fits into a busy routine. Items can be washed, placed in the sterilizer, and left to process without standing over a pot. Some steam sterilizers also keep items protected for a period of time if the lid remains closed, though the exact timing depends on the product instructions.
The important part is not to guess. Every steam sterilizer has its own directions for water level, cycle time, cooling, and storage. Adding too little water or crowding items too tightly may affect how well the steam reaches each surface.
Steam is especially useful for bottles, nipples, pacifiers, and pump parts that are labeled safe for steam sterilizing. It is not suitable for every toy or accessory, especially anything with batteries, electronic parts, fabric, or materials that may warp with heat.
Dishwasher Cleaning and Sanitizing
A dishwasher can make baby gear cleaning much easier, but it depends on the item and the dishwasher settings. Many bottles and some feeding accessories are dishwasher-safe, usually on the top rack. Small parts should be placed in a covered basket so they do not fall into the filter or heating area.
A normal dishwasher cycle cleans, but a hot water cycle with heated drying or a sanitizing setting may offer extra germ reduction. This is especially helpful for families who use several bottles a day and need a reliable routine.
Even with a dishwasher, items should be taken apart and rinsed before loading. Bottle nipples, valves, and tiny pieces should be checked after washing to make sure no milk residue remains. If something still looks cloudy or feels slippery, wash it again by hand.
Dishwashers are convenient, but they are not magic. They work best when used with care, enough space between items, and a proper drying cycle. Moisture left trapped inside bottles or small parts can encourage mold, which is exactly what parents are trying to avoid.
Cold Water Sterilizing Solutions
Cold water sterilizing is another method, often used when boiling or steam sterilizing is not convenient. It involves placing clean baby gear into a sterilizing solution for a set amount of time. The items must stay fully submerged, with no trapped air bubbles inside bottles or nipples.
This method can be useful while traveling or when kitchen access is limited. It does not require electricity, a microwave, or a stove, which makes it practical in certain situations. However, it does require careful measuring and attention to timing.
The solution should be prepared exactly as directed, and it should be changed as recommended. Baby items should not be left floating at the top or half-covered. If the solution cannot touch a surface, that area is not being properly sterilized.
Some parents dislike the smell of cold water sterilizing solutions, while others appreciate the convenience. Like every method, it comes down to what fits your routine and what your baby’s gear can safely tolerate.
What Baby Gear Actually Needs Sterilizing
Not every baby item needs the same level of cleaning. Feeding equipment usually deserves the most attention because it comes into direct contact with milk, formula, and the baby’s mouth. Bottles, nipples, caps, breast pump parts, pacifiers, medicine syringes, and teething items are the usual priorities.
Soft toys, blankets, and fabric bibs are generally washed rather than sterilized. Plastic toys that do not go in the mouth may only need regular cleaning, unless they have been dropped somewhere dirty or handled by someone who is sick. Bath toys need special care because water can get trapped inside and lead to mold.
The goal is to focus your energy where it matters most. Sterilizing every object in a baby’s life is not realistic, and it is usually not necessary. Feeding gear, mouth-contact items, and anything used by a very young or medically vulnerable baby should come first.
How Often Sterilizing Is Needed
How often you sterilize depends on your baby’s age, health, and feeding routine. Newborns and young infants usually need more careful hygiene, especially in the first months. Babies who were born prematurely or have a weakened immune system may need extra precautions, and parents should follow medical advice for their specific situation.
For older, healthy babies, careful washing after each use may be enough for many items, depending on local guidance and water quality. Some parents still prefer daily sterilizing because it gives them peace of mind. Others sterilize bottles less often once the baby is older and the feeding routine feels settled.
The key is consistency. Bottles should not sit around with leftover milk inside. Pump parts should not be left damp in a closed bag. Pacifiers should not be wiped quickly on clothing and handed back as if they are clean. Small habits make a big difference.
Drying and Storage Are Part of the Process
Sterilizing does not end when the heat or solution cycle is finished. Drying and storage matter just as much. Clean baby gear should be handled with washed hands and placed on a clean surface to air-dry. Rubbing items dry with a used kitchen towel can transfer germs back onto them.
Once items are completely dry, they should be stored in a clean, closed space. A covered container or clean cabinet works better than leaving bottles and nipples exposed on a counter all day. If bottles are assembled while still damp, moisture may get trapped inside.
This is the part of the routine that often gets overlooked. Parents may carefully sterilize everything, then place the items near the sink, where splashes and food prep happen. A clean drying area and safe storage spot help protect the effort you have already made.
A Calm Routine Makes It Easier
Sterilizing baby gear can seem like a lot at first, especially when feeding happens around the clock. The easiest way to manage it is to build a routine that feels natural. Some parents wash items right after each feed. Others collect used bottles in a clean basin and wash them in batches. Some sterilize once in the evening so everything is ready for the next day.
There is no need for perfection, but there is value in having a system. Keep brushes, drying space, and storage containers organized. Replace worn nipples and pacifiers before they become a problem. Check labels before using heat. And when in doubt, keep feeding items cleaner than you think they need to be.
Parenting already comes with enough pressure. Sterilizing should be a protective habit, not another reason to feel anxious.
Conclusion
The best methods for sterilizing baby gear are the ones that are safe, practical, and easy enough to repeat. Boiling, steam sterilizing, dishwasher sanitizing, and cold water solutions can all work when used correctly. What matters most is cleaning items first, choosing the right method for the material, drying everything properly, and storing baby gear in a clean place.
Sterilizing baby gear is not about making parenthood spotless. It is about reducing risk in the small daily moments that shape a baby’s care. With a steady routine and a little attention to detail, the process becomes less overwhelming and more like second nature. Clean bottles, safe pacifiers, and well-cared-for feeding items may seem simple, but they help create a healthier, calmer start for both baby and parent.