
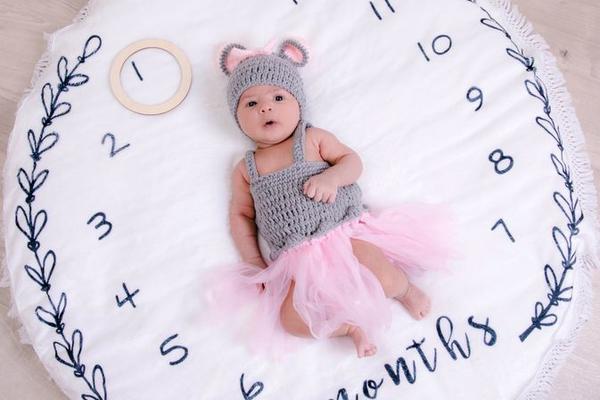
The most touching first-year photo series is often the simplest: one familiar setting, one small monthly marker, and a baby who changes in unpredictable ways. Rather than inventing a new theme every four weeks, choose a repeatable composition that lets growth tell the story. These newborn monthly milestone photo ideas work with a phone, a window, and a few comfortable minutes.
Build one setup you can repeat twelve times
Pick a safe, uncluttered spot on the floor with soft daylight from the side. Use the same washable mat or fitted background, ideally in a neutral colour. Take each picture from roughly the same position, with the camera parallel to the floor for overhead shots. Mark where you stand so your framing remains similar as your baby grows.
Choose one simple marker, such as a month card placed well away from your baby’s face and hands. Keep it in the same corner each time. A favourite soft toy can provide a visual size reference, but position it outside the baby’s reach and remove it immediately after the picture. Consistency matters more than coordinated outfits.
Make the routine easy to repeat
Photograph your baby near the same date each month, but allow flexibility. Aim for a fed, rested, alert moment instead of a rigid appointment. Save one wide photograph in the same framing, then take a close-up of that month’s expression or tiny detail. This gives your monthly baby milestone photos both consistency and personality.
Month-by-month photo ideas for the first year
Month 1: The curled-up beginning
Capture your baby’s relaxed face, small hands and naturally tucked legs while lying comfortably on their back. Keep the first picture simple; this becomes the visual starting point for the entire series.
Month 2: Eyes toward the camera
Try photographing a bright, alert moment as your baby looks toward your voice. Stand close to the camera so their gaze follows you without needing elaborate props or positioning.
Month 3: A familiar smile
Invite a natural expression with quiet conversation or a favourite sound. If a smile doesn’t arrive, photograph the thoughtful look instead. Record your baby rather than forcing a pose.
Month 4: Hands in the picture
Include an overhead frame where fingers, hands and playful movements become the focus. Even slight changes in how your baby explores their hands can make the familiar setup feel new.
Month 5: A favourite expression
Take the usual wide shot, then move closer for a curious stare, laugh or serious face. Month by month baby pictures feel richer when they show changing expressions alongside changing size.
Month 6: Halfway comparison
Recreate the first month’s composition as closely as possible. The contrast between early and halfway baby growth photos can be striking without extra decoration. Add a separate supported sitting portrait only if appropriate.
Month 7: Reaching and exploring
Photograph your baby interacting with their own hands or looking toward a familiar person. Keep the main image consistent and let a second candid photograph record whatever catches their attention.
Month 8: A different perspective
Maintain your signature overhead photo, then take an eye-level portrait while your baby is securely supported on the floor. This companion shot captures personality without disrupting the monthly comparison.
Month 9: Movement in the frame
Some babies roll, pivot or crawl at this stage; others move differently. Take the photo when your baby is settled, and let a little motion become part of the story rather than insisting on stillness.
Month 10: Playful reactions
Invite a peekaboo reaction from just beside the lens. Keep your usual composition first, then photograph the spontaneous response. A steady frame and genuine laughter work especially well together.
Month 11: A growing personality
Choose a familiar sound, song or game to bring out your baby’s current expression. Notice how their posture and engagement have changed, without comparing their skills to another child’s timeline.
Month 12: The first-year finale
Repeat the original setup one last time, using the same background and marker placement. Afterwards, add a birthday portrait with a favourite outfit or family member. The matched image is the keepsake.
Keep the photos consistent without making them identical
Use the same lens setting, orientation and approximate camera distance every month. Avoid heavy filters that change skin tones or background colours. If lighting differs, adjust brightness gently instead of editing away natural skin texture. A simple guide to natural light newborn photography can help you establish a repeatable window setup.
For example, imagine placing a cream mat beside a north-facing window and a small month card in the upper-left corner. At one month your baby fills the middle of the mat; by twelve months they occupy much more of it. That reference makes first year milestone photos immediately readable.
Put comfort and safety ahead of the shot
Stay within arm’s reach throughout the session. Never leave a baby unattended on a bed, table or other raised surface, and never force a sitting or standing pose. For awake tummy-time pictures, supervise continuously and stop when your baby tires. Keep cords, small objects, loose accessories and decorative props away from their mouth and face.
If your baby falls asleep, end the staged session and move them to a safe sleep space on their back, following safe-sleep guidance. A photograph can always happen another day. Gentle newborn photo poses never require balancing or complicated supports.
Turn twelve photos into one meaningful record
Save original files in a folder labelled by month, then select one main image from each session. Crop all twelve to the same shape before arranging them in a grid. Keep a second collection for close-ups and family moments. A baby milestone photo collage works especially well when every picture shares a background and camera angle.
Record a small detail beside each image, such as a favourite sound, expression or nickname. Notes preserve what a photograph cannot show.
Frequently asked questions
When should I start monthly milestone photos?
You can begin during the newborn period or whenever your family feels ready. If you miss the earliest weeks, start now rather than trying to recreate an earlier stage.
Do I need professional equipment?
No. A phone camera and indirect window light are enough. Reliable framing and comfortable timing often contribute more to a coherent series than an elaborate camera or backdrop.
What if my baby will not stay in one position?
Adapt the setup to their current mobility. Use a safe floor-level position, take quick candid frames and accept movement. You can still match the background, marker and crop when their pose changes.
Should each month show a specific developmental milestone?
No. Babies develop at different rates. The series should document what your baby is doing naturally rather than turn a photo session into a test of sitting, crawling or walking.
A year of small moments
The appeal of newborn monthly milestone photo ideas lies in their simplicity. One familiar frame makes each change easier to notice, while spontaneous extras capture your baby’s character. At year’s end, you will have more than twelve polished pictures: an honest visual story of growing together.